Hello again fellow Android advocate, nice to have you here again.
We are aware the quick introduction to the widget’s world in Android and React Native was not enough, and we left you with tons of open thoughts and questions. We are here again to try to solve some of them.
In this opportunity, we want to deep dive in the Android platform and all the Jetpack libraries we used in our favour during our journey in the widget world. Let’s start by discussing our main goal here. What is a widget?
Context overview: Widgets vs Application
Yes, we know the title is a bit misleading, but for the ones who don’t know, widgets are elements of an application (same as activities or services).
A widget is a miniature lightweight view, frequently used to display, and in some cases interact, with a dedicated piece of the app without actually opening it.
- “Miniature” means that widgets never take the full screen: they’re usually placed in different locations such as the home screen or lock screen.
- Being “lightweight” means that widgets don’t really have a dedicated process actively running in the OS. Widgets are usually woken up on demand by other processes (and we will talk about this later). When this happens, they have limited time and resources to run the required updates, and are sent back to sleep after.
Building widget’s UI with help of Jetpack
Nowadays front-end developers love to build their UI using declarative style and Android developers are not an exception. Jetpack Compose was introduced not-so-long ago to fulfil this requirement. There is already plenty of material about it, but if you are not familiar with it, you can start from here.
But when it comes to widgets, UI works a bit different from the Activities or Fragments we are used to working with. Widgets have limited resources, and this includes limited support for custom layouts, styles or fonts, among others. Due to all these existing limitations, Jetpack introduced Glance. This new library allowed us to create a declarative UI using compose, but with the limited resources that a widget provides.
After working with Glance for a while, we can recap some of the differences we found so far:
Layout and Modifiers:
Unlike the usual UI elements we work with, widgets have limited support for layouts and UI elements.
ConstraintLayouts are not yet supported, and this brings a lot of limitations to place your UI elements in the proper way.
The easiest solution we found, and it doesn’t solve all possible problems you can face when building a widget complex layout, was to play around with the boxing model.
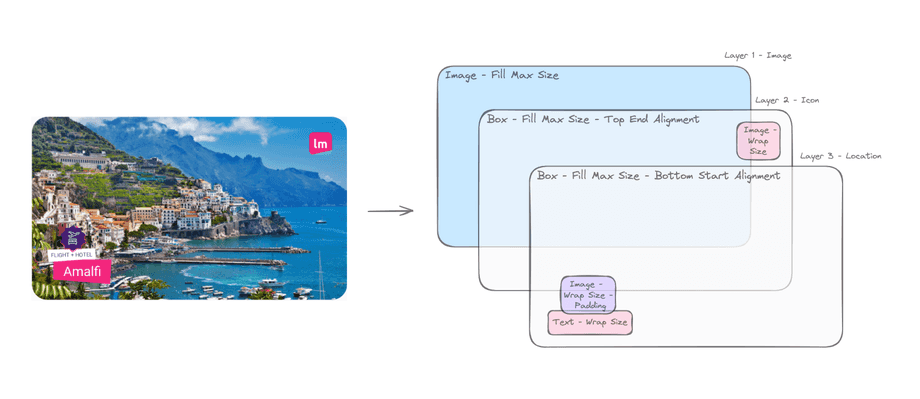
Core layout elements (Box, Row and Column) are provided, and with help of the GlanceModifiers for their alignment and sizing, it is possible to come up with a complex layout by adding multiple layers of basic elements.
Let’s see a quick example:
// Widget Root
Box(
    modifier = GlanceModifier.fillMaxSize().cornerRadius(8.dp),
    contentAlignment = Alignment.Center,
) {
    // Layer 1 - Image
    CachedImage(
        modifier = GlanceModifier.fillMaxSize(),
    )
    // Layer 2 - Icon
    Box(
        modifier = GlanceModifier.fillMaxSize().padding(all = 16.dp),
        contentAlignment = Alignment.TopEnd,
    ) {
        //... Render brand logo
    }
    // Layer 3 - Location
    Box(
        modifier = GlanceModifier.fillMaxSize().padding(all = 16.dp),
        contentAlignment = Alignment.BottomStart,
    ) {
        //... Render Location + Special Offer Logos
    }
}
Rendering local resources:
Some resource helpers (like getString or ImageProvider) won’t work for Glance composables, but Glance enables a different subset of utilities to handle them.
Rendering String resources with Text
// Compose
Text(
   text = stringResource(id = R.string.mobile_app_inspire_widget_config_title),
)
// Glance
Text(
   text = context.getString(R.string.mobile_app_inspire_widget_config_text),
)
Rendering Image resources with Image
// Compose
Image(
   painter = painterResource(id = R.drawable.brand_icon),
   contentDescription = null,
)
// Glance
Image(
   provider = ImageProvider(resId = R.drawable.brand_icon),
   contentDescription = null,
)
Remote image support:
Image elements have an extra hidden complexity when it comes to remote resources. As widgets have limited time to render, downloading images in the background is not an easy task. You cannot use libraries like Glide the same way you would do with Compose. There are some examples you can look at, but overall what you need to know is to download the image in advance, and when the resource is finally downloaded and stored locally, you can ask the widget to render it.
In our case, we ended up using Glide’s cache support in our favour. Let’s look at a simple example:
1 - Load url content in background with help of GlideImageDatasource
class GlideImageDatasource(private val context: Context) : IRemoteImageDatasource {
    override fun getCachedFilePath(imageUrl: String): String? =
        Uri.parse(imageUrl).runCatching {
            Glide.with(context)
                .asFile()
                .load(this)
                .skipMemoryCache(true)
                .submit()
                .get()
                .absolutePath
        }.getOrNull()
}
2 - Render Image with CacheImage
@Composable
fun CachedImage(
    filePath: String,
    @DrawableRes placeholder: Int,
    contentDescription: String?,
    modifier: GlanceModifier = GlanceModifier,
    contentScale: ContentScale = ContentScale.Fit
) {
    val provider = filePath.runCatching {
        ImageProvider(BitmapFactory.decodeFile(this))
    }.getOrElse {
        ImageProvider(placeholder)
    }
    Image(
        provider = provider,
        contentDescription = contentDescription,
        modifier = modifier,
        contentScale = contentScale,
    )
}
Buttons and action callbacks:
As mentioned earlier, widgets allow user interaction. Glance provides Button support to handle user feedback. But again, we need to take into consideration we are working with limited resources. As widgets don’t have a dedicated process, there is a specific way to deal with actions callbacks.
For some of the common actions like Intents, Glance provides support functions out of the box. You can also create your own custom callbacks as well. Let’s see some examples:
Open a new Activity using built-in helpers
modifier = GlanceModifier.clickable(
    onClick = actionStartActivity(
        InspireWidgetConfigActivity::class.java
    )
)
Create your own action callback
// Define it
class SearchForDealCallback : ActionCallback {
    companion object {
        val searchDealKey = ActionParameters.Key<String>(
            "SearchForDealCallback:deal"
        )
        val searchConfigKey = ActionParameters.Key<String>(
            "SearchForDealCallback:config"
        )
    }


    override suspend fun onAction(
        context: Context,
        glanceId: GlanceId,
        parameters: ActionParameters,
    ) {
        val deal = parameters[searchDealKey]?.toDeal()
        val config = parameters[searchConfigKey]?.toSearchParameters()

         // ...do something
    }
}

// Then use it

modifier = GlanceModifier.clickable(
    onClick = actionRunCallback<SearchForDealCallback>(
        parameters = actionParametersOf(
            SearchForDealCallback.searchDealKey to deal.toJsonString(),
            SearchForDealCallback.searchConfigKey to config.toJsonString()
        ),
    ),
),
Manage widget’s UI state through Preferences
Another big missing piece you will notice when working with widgets is the lack of ViewModels. As widgets have limited time to render, they don’t really need a ViewModel running aside. But then where do we get the UI state we want to render?
There are several answers to this question. You can check the suggested one here, but the most useful one we found was on Preferences.
Thanks to Glance and the interoperability with Jetpack Datastore it’s pretty easy to create and maintain UI state inside Preferences. As Preferences are stored in a file, the state survives the widget lifespan and also becomes accessible from any other point of your application.
With this model, it becomes easier than ever to affect the state of the widget from inside the application’s activity or other background services, as we will see later on in this post.
There are some simple setup steps you need to follow:
Create a new DataStore
const val INSPIRE_PREFS_FILE: String = "fileName"
val Context.inspirePreferences: DataStore<Preferences>
    by preferencesDataStore(name = INSPIRE_PREFS_FILE)
Create your Glance State Definition
class InspireWidgetStateDefinition : GlanceStateDefinition<Preferences> {
    override suspend fun getDataStore(
        context: Context, fileKey: String
    ): DataStore<Preferences> = context.inspirePreferences

    override fun getLocation(
        context: Context,
        fileKey: String,
    ): File = context.preferencesDataStoreFile(INSPIRE_PREFS_FILE)
}
Apply it on your widget
class InspireWidget : GlanceAppWidget() {
    override val stateDefinition: GlanceStateDefinition<*> =
        InspireWidgetStateDefinition()
}
Grab the state as usual
@Composable
fun InspireWidgetContent(
    modifier: GlanceModifier = GlanceModifier,
    context: Context = LocalContext.current
) {
    val preferences = currentState<Preferences>()

    // ... render as usual
}
Update widget using background jobs
Amazing, we know how and what to render on a widget. Let’s solve the last question: when. As already mentioned, widgets have limited time to render and are woken up to do the job. When does that happen? The answer (and responsibility) is up to you.
Glance provides an API to trigger the widget’s render whenever you decide:
InspireWidget().updateAll(appContext)With help of this method now you need to think when your widget is supposed to update. It really depends on the requirements, but for us, it was just a fixed period of time.
The main goal was after a certain period of time, fetch the newest information, update the widget’s state inside preferences, and request a re-render of the widget. And yet again, Jetpack came to the rescue.
If you haven’t heard of WorkManager, all you need to know is that it provides an amazing API to create an application’s background jobs scheduled under a variety of conditions you can use in your favour. Let’s check how it works:
The first step is to create a background worker. As we’ve been working with coroutines, WorkManager provides a specific class which supports them out of the box.
@HiltWorker
class RefreshWidgetWorker @AssistedInject constructor(
   @Assisted val appContext: Context,
   @Assisted workerParams: WorkerParameters
) : CoroutineWorker(appContext, workerParams) {
   @Inject
   lateinit var updateCurrentDealUseCase: UpdateCurrentDealUseCase

   @OptIn(ExperimentalCoroutinesApi::class)
   override suspend fun doWork(): Result {
       val updateResult = updateCurrentDealUseCase(Unit).firstOrNull()
       if (updateResult is UseCase.Result.Success) {
           InspireWidget().updateAll(appContext)
           return Result.success()
       }
       return Result.failure()
   }
}
Are you wondering what those fancy decorators (@Assisted, @Inject) do? We’ll talk about them in a later post, so stay in touch to know when it drops!
Now you define what you want to do, you just need to schedule with help of the lib. But here goes an extra tip for your widget.
We found out Glance provides lifecycle callbacks for the installation of a new instance of your widget. So what we did in the end was to schedule the update when the first instance of the widget is placed.
The library also provides a simple way to clean the schedule in case you don’t want it any more. And the same goes for the lifecycle event. We just cleaned up the schedule when the last instance of the widget was removed.
Schedule using work manager
class DealsWorkManager(
    private val manager: WorkManager,
) {
    companion object {
        private const val PERIODIC_UPDATE_TASK_ID = "DealsWorkManager:PERIODIC_UPDATE_TASK_ID"
    }

    private fun schedulePeriodicSyncTask() {
        val workRequest = PeriodicWorkRequestBuilder<RefreshWidgetWorker>(1, TimeUnit.HOURS)
            .addTag(PERIODIC_UPDATE_TASK_ID)
            .build()
        manager.enqueueUniquePeriodicWork(
            PERIODIC_UPDATE_TASK_ID,
            ExistingPeriodicWorkPolicy.REPLACE,
            workRequest
        )
    }

    fun cleanPeriodicSyncTask() {
        manager.cancelUniqueWork(PERIODIC_UPDATE_TASK_ID)
    }
}
Listen for lifecycle callbacks
@AndroidEntryPoint
class InspireWidgetReceiver : GlanceAppWidgetReceiver() {
   @Inject
   lateinit var workManager: DealsWorkManager


   override val glanceAppWidget: GlanceAppWidget = InspireWidget()


   override fun onEnabled(context: Context?) {
       super.onEnabled(context)
       workManager.schedulePeriodicSyncTask()
   }

   override fun onDisabled(context: Context?) {
       workManager.cleanPeriodicSyncTask()
       super.onDisabled(context)
   }

}
There is a caveat you need to know when working with WorkManager. For some of the hardware providers, you’ll need to request the autostart permission in advance to allow workers to run. You can check more or less how it’s done here and also take this reference on all possible things that can go wrong with android apps.
Joining all the pieces together
Let’s recap what we know so far:
- Jetpack Glance helps us to manage our widget render, plus the APIs to control when to render it.
- Jetpack Datastore eases the way to get, update and persist the data we need to render our widget across time.
- Jetpack WorkManager provides an easy way to create a feedback loop through background tasks.
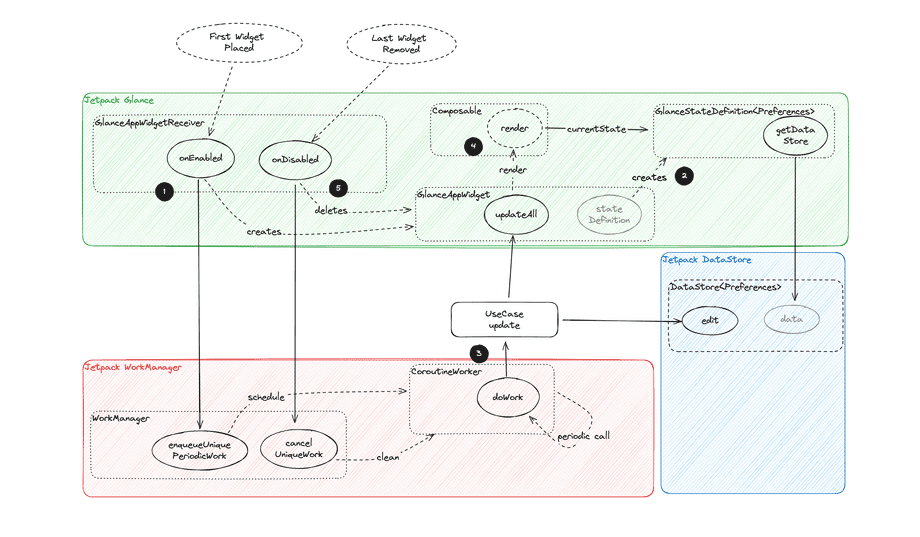
The full cycle works like this more or less:
- When you install the widget, the work manager creates a schedule.
- The widget also creates the preference file to hold its state.
- The schedule triggers your background worker, which will update the preferences file with the latest data, and trigger the widget re-render just after that.
- Widget wakes up again and renders the updated data.
- When you uninstall the widget, the work manager will clean the related schedule to prevent invalid updates.
Aside from the periodic schedule we showcased, think on this process for a variety of scenarios, like loading a remote image on demand, reacting to a user action by running some network request and so many others.
That was a lot to cover, and we have a lot more to share from our experience in the widget’s world.
So keep following our adventures in the upcoming posts!
See ya!


