
Technology
Widget for our iOS app using SwiftUI: the Technical Implementation


Join us in the Widget creation journey from drawing the UI, creating the timeline, calling the API and adapting the response, setup and reading the user configuration, and finally invoking the React Native app to display the search results.
In the previous post, we presented our FriYaY project: an inspirational iOS widget.
We showed the process from start to finish, now it’s time to go deep into the technical details.
Join us in the journey from drawing the UI, creating the timeline, calling the API and adapting the response, setup
and reading the user configuration, and finally invoking the React Native app to display the search results.
UI with SwiftUI
Just to recap, we went with a design that shows a single deal using all the space of the widget itself. This means:
- putting the location image as background
- adding some branding elements above
- making the entire widget area touchable
- opening the app via a custom url, that will be used by React Native to load the search results

The main view is DealCard. It contains BackgroundImage, that displays the image as background on the widget,
and a DealOverlay used for the branding messages. These components are displayed in a ZStack in order
to show them one above the other.
struct DealCard: View {
  let deal: Deal

  var body: some View {
    Link(destination: deal.url) {
      ZStack(alignment: Alignment.center) {
        BackgroundImage(image: deal.image)
        DealOverlay(cityName: deal.cityName)
      }
    }
  }
}
The BackgroundImage component is really simple: it just contains the image with an overlay to create some shadow
effects.
struct BackgroundImage: View {
  let image: UIImage

  var body: some View {
    Color.clear.overlay(
      Image(uiImage: image)
        .resizable()
        .aspectRatio(contentMode: ContentMode.fill)
        .overlay(
            LinearGradient(
                gradient: Gradient(colors: [Color("ShadowColor"), Color.clear]),
                startPoint: .top, endPoint: .center)
            )
        )
    )
  }
}
Instead, DealOverlay is a bit more complex. It contains a VStack where we show our logo, and another
VStack where we show the destination name and the deal type (eg. flight + hotel).
For the destination city we implemented also a custom background using Shape and Path in order to create a
catching effect.
Last but not least, when the user install the widget, we show a default Configure view where we ask the user to
configure it to see the deals.
struct Configure: View {
  let configurationImageName: String

  var body: some View {
    ZStack{
      BackgroundImage(
        image: UIImage(named: configurationImageName)!,
        overlay: LinearGradient(gradient: Gradient(colors: [Color("ShadowColor")]),
                                startPoint: .top, endPoint: .bottom)
      )
      Group {
        Spacer()
        HStack(alignment: VerticalAlignment.center) {
          Spacer()
          Text(LocalizedStringKey("widget.inspirational.configure"))
            .foregroundColor(Color("TextColor"))
            .font(Font.custom("Ubuntu-Regular", size: 16))
            .multilineTextAlignment(TextAlignment.center)
          Spacer()
        }
        Spacer()

      }
    }
  }
}
The IntentTimelineProvider
This is the core business logic of the widget. We implemented the protocols required by WidgetKit in order
to serve our deal. To do this we put in place a hexagonal architecture, where we abstracted from the
technological implementation on network and adapting side.
Below you can find the complete diagram of the widget classes and how they communicate.
")
First we started implementing the DealsProvider, that is in charge to display the deals. This class uses two
collaborators:
FakeDealEntryProvider, it creates a fake deal to display during the setup of the widgetDealEntryProvider, it calls our API and actually build the real timeline with the current deal
class DealsProvider: IntentTimelineProvider {
  private let dealsEntryProvider: DealsEntryProvider

  init(dealsEntryProvider: DealsEntryProvider) {
    self.dealsEntryProvider = dealsEntryProvider
  }

  func placeholder(in context: Context) -> DealEntry {
    return FakeDealsEntryProvider.shared.get()
  }

  func getSnapshot(for configuration: InspirationalConfigurationIntent, in context: Context, completion: @escaping (DealEntry) -> Void) {
    completion(FakeDealsEntryProvider.shared.get())
  }

  func getTimeline(for configuration: InspirationalConfigurationIntent, in context: Context, completion: @escaping (Timeline<DealEntry>) -> Void) {
    if configuration.locationParameter != nil {
      Task {
        let dealsEntry = try await dealsEntryProvider.getUsing(configuration: configuration)
        let timeline = Timeline(entries: dealsEntry, policy: .atEnd)
        completion(timeline)
      }
    } else {
      completion(Timeline(entries: [FakeDealsEntryProvider.shared.get(isConfigured: false)], policy: .atEnd))
    }
  }
}
The DealsEntryProvider adapts the deal received from the DealsRepository in a DealEntry. It passes the
InspirationalConfigurationIntent to the repository. This object contains the user configured values during the
installation.
class DealsEntryProvider {
  private let dealsRepository: DealsRepository

  init(dealsRepository: DealsRepository) {
    self.dealsRepository = dealsRepository
  }

  func getUsing(configuration: InspirationalConfigurationIntent) async throws -> [DealEntry] {
    return try await self.dealsRepository.getUsing(configuration: configuration).enumerated().map({ index, deal in
      DealEntry(
        date: Calendar.current.date(byAdding: .hour, value: index, to: Date())!,
        deal: deal,
        configurationImageName: nil
      )
    })
  }
}
The DealsRepository uses the RestClient to get the data from our API. To decide the right url to be called
(based on user parameters e.g. the language) it calls the DealsFeedUrlRepository. It then uses the DealsAdapter
in order to convert the json representation into our Deal domain object.
class DealsRepository {
  private let restClient: RestClient
  private let dealsAdapter: DealsAdapter
  private let dealsFeedUrlRepository: DealsFeedUrlRepository

  init(restClient: RestClient, dealsAdapter: DealsAdapter, dealsFeedUrlRepository: DealsFeedUrlRepository) {
    self.restClient = restClient
    self.dealsAdapter = dealsAdapter
    self.dealsFeedUrlRepository = dealsFeedUrlRepository
  }

  func getUsing(configuration: InspirationalConfigurationIntent) async throws -> [Deal]  {
    let dealsJson: [DealServiceData] = try await restClient.getData(from: dealsFeedUrlRepository.get())
    let deals = try await dealsAdapter.adapt(dealsServiceData: dealsJson, configuration: configuration)
    return deals
  }
}
RestClient is our network client implementation. It leverages the new async/await Swift 5.5 feature. So instead
of having callbacks/closure, we wrote our network client with a very similar syntax to the one used in other
languages (e.g. TypeScript). Anyway this requires (again as in other languages) that all the caller should be
async on their own. You can break the chain of asynchronous calls using a Task { ... } object (see
DealsProvider above).
class RestClient {

  func getData<T: Decodable>(from url: URL) async throws -> T {
    let (data, _) = try await get(from: url)
    let decoder = JSONDecoder()
    decoder.keyDecodingStrategy = .convertFromSnakeCase
    let dealsJson = try decoder.decode(T.self, from: data)
    return dealsJson
  }

  func getImage(from url: URL) async throws -> UIImage {
    let (data, _) = try await get(from: url)
    return UIImage(data: data)!
  }

  private func get(from url: URL) async throws -> (Data, URLResponse) {
    return try await URLSession.shared.data(from: url)
  }
}
Intent Configuration
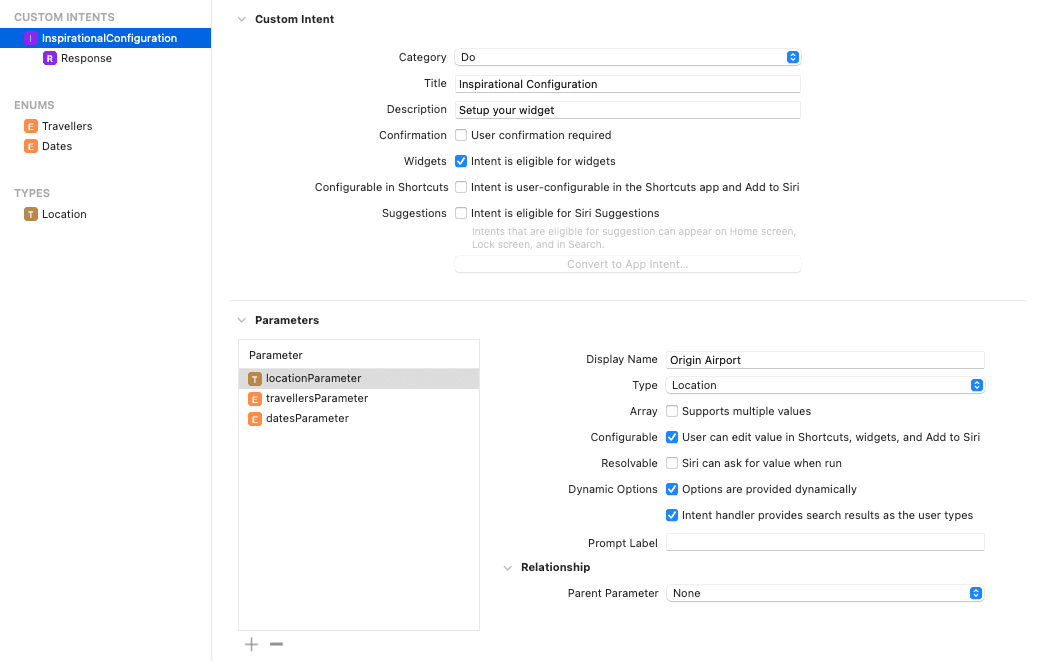
Our customers can customise the widget results, specifically: choose the departure airport, how many travellers, and the preferred dates. From development point of view this is possible using an Intent, as you see from the screenshot below.
- The locationParameter will handle the departure airport, it has both the checkbox under
Dynamic Optionenabled, since it will fetch the values from a Remote API - The travellersParameter is an ENUM and will contain the number of travellers
- The datesParameter is also an ENUM, with three options
To provide the dynamic options to the intent you have to create an Intent Extension, which are used also for Siri and
Shortcuts.
The protocol will be named as <name>IntentHandling, and will call the repository via the same RestClient as before.
We also put in place some ad-hoc adapting in other to translate our API response to fit with the iOS-required type.
class IntentHandler: INExtension, InspirationalConfigurationIntentHandling {
  private let suggesterLocationsRepository = SuggesterLocationsRepository(
    suggesterLocationsAdapter: SuggesterLocationsAdapter(),
    suggesterLocationsUrlCreator: SuggesterLocationsUrlCreator()
  )

  func provideLocationParameterOptionsCollection(for intent: InspirationalConfigurationIntent, searchTerm: String?) async throws -> INObjectCollection<Location> {
    let locations: [Location] = try await suggesterLocationsRepository.get(searchTerm: searchTerm)
    return INObjectCollection(items: locations)
  }

  override func handler(for intent: INIntent) -> Any {
    return self
  }
}
Communication with React Native
To trigger the search on the app side, we used the deep linking method: we created a custom URL schema with
parameters, and we attached it to the deal card with a Link SwiftUI component. On tap, the link will go through
the AppDelegate and then shared to React Native via RCTLinkingManager.
- (BOOL)application:(UIApplication *)app
            openURL:(NSURL *)url
            options:(NSDictionary *)options {
  //... other code

  return [RCTLinkingManager application:app openURL:url options:options];
}
On the React Native side, in the main screen, we have a LinkDispatcher collaborator that listens to custom URLs
and dispatches the correct actions (for example, navigates to a specific screen).
When a link is coming from the iOS Widget, we will parse the parameter, create a new search and open the result screen.
export class LinkDispatcher {
  constructor(
    private readonly widgetsNavigatorHelper: WidgetsNavigatorHelper, //.. other classes
  ) {}

  async dispatchLink(link: string): Promise<void> {
    //... other code

    if (this.isWidgetLink()) {
      await this.dispatchWidgetLink(link);
    }

    //... other code
  }

  private async dispatchWidgetLink(link: string): Promise<void> {
    return this.widgetsNavigatorHelper.navigate(this.navigation, this.link);
  }
}

export class WidgetsNavigatorHelper {
  //... other code

  async navigate(navigation: any, url: string): Promise<void> {
    //... other code
    this.navigation.openSearchScreenUsing(parseParamsFrom(url));
  }
}
Conclusion
That’s all for the technical implementation of the widget.
If you want to know more about our FriYaY journey into WidgetKit, follow the links below:
Read next


From Months to Weeks: The Smart Way to Let AI Do a Migration


How we migrated 137 modules to a new dependency-injection pattern with AI, turning a quarter-long slog into a few focused weeks by teaching the AI instead of delegating to it, working in small supervised steps, and letting the method compound. [...]


Written by lastminute.com folks, who live for the holidays. You should follow us on Twitter.

Want to express your love for travel and tech? Well, you could read another article, or you could just come and join us. We’re always looking for talent to help us enrich the lives of travellers - find your role here.
The postings on this site are authors' opinions and experiences and do not necessarily represent the postings, strategies or opinions of lastminute.com group.